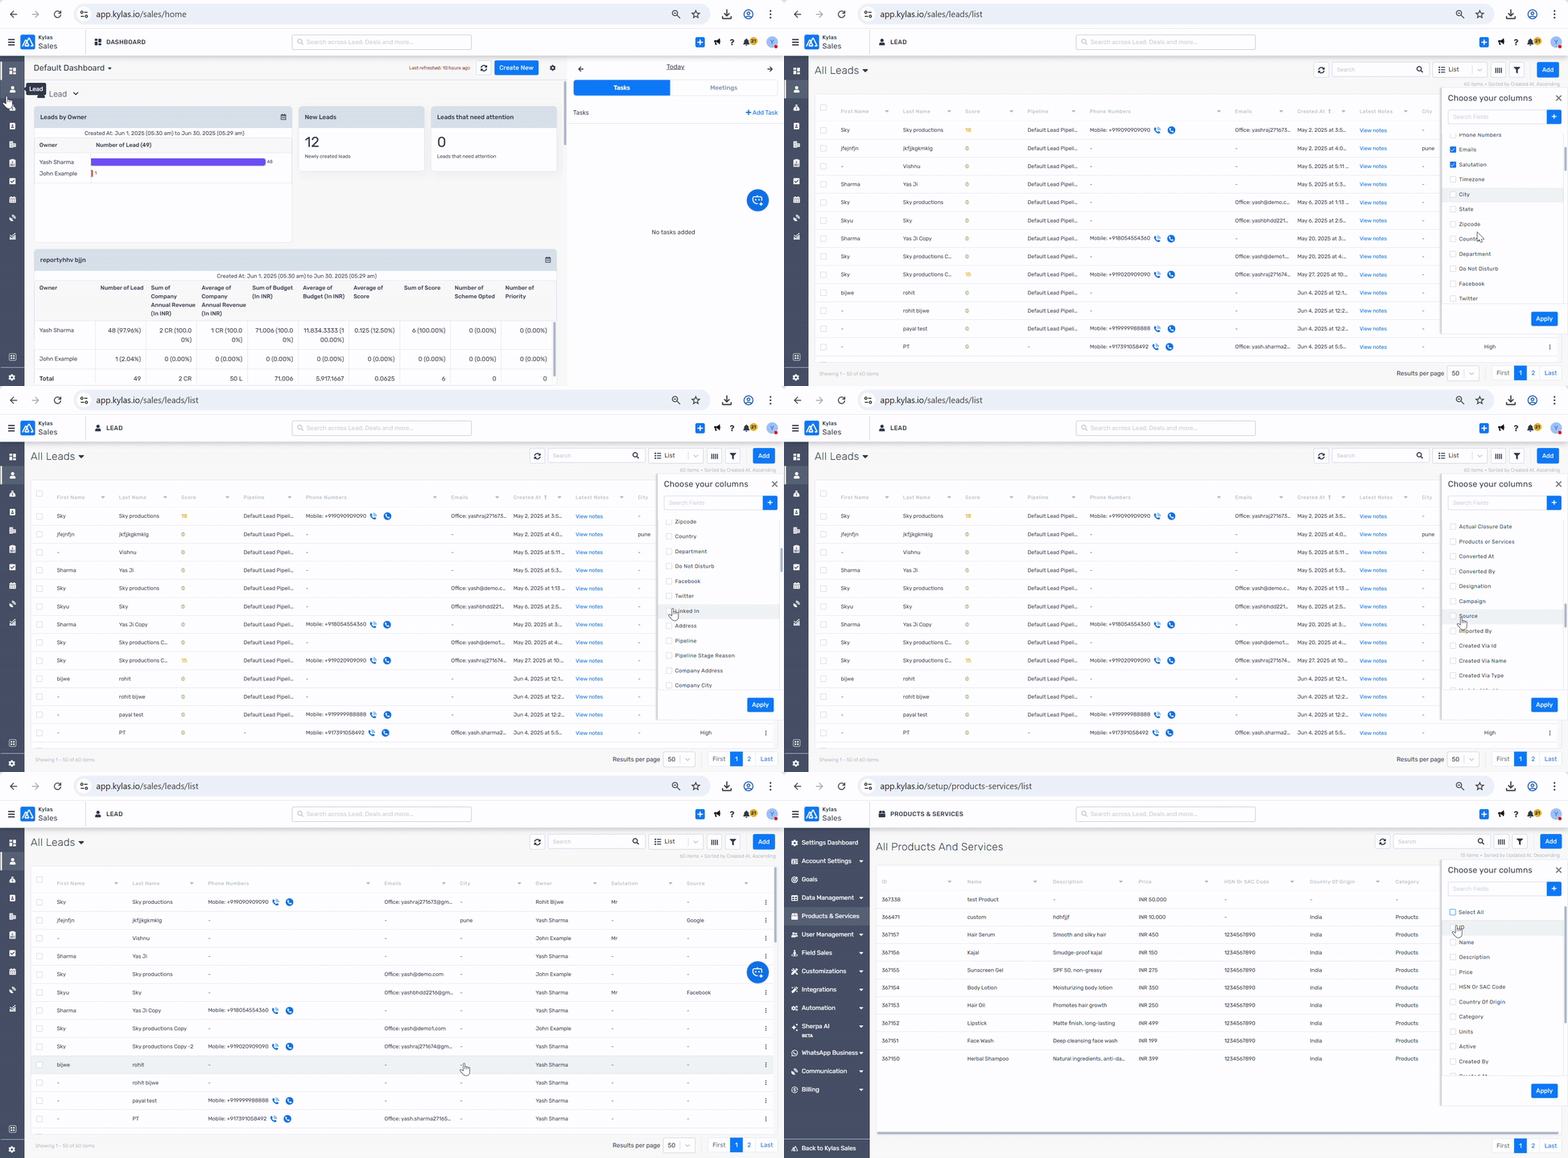
In Kylas CRM, the listing page (also called the list or table view) is where you see a grid of records—such as leads, deals, contacts, or companies. To make your day-to-day CRM experience more efficient, Kylas lets you customize the columns shown on these pages so you only see the data that matters most to you.
This guide will walk you through all the prerequisites, supported modules, step-by-step actions, real-world use cases, and best practices.
Prerequisites
Before you begin customizing the columns:
You must have access to the module you're customizing (e.g., Leads, Deals, Contacts, etc.)
You should have View permission for the fields you want to display in your list view
No admin rights are required – every user can personalize their own column layout
Ensure the fields (standard or custom) are already created in that module
Table of Contents
Why Customize Columns?
Supported Modules
Step-by-Step Guide
Use Cases by Role
Best Practices
Why Customize Columns?
Customizing your listing columns lets you:
Reduce clutter by hiding unused fields
Highlight only the key data points you care about
Improve efficiency by scanning important info at a glance
Tailor the view based on your role, process, or campaign
Prepare list views for exporting reports or bulk actions
Supported Modules for Column Customization
You can add/remove columns in the following modules:
Step-by-Step Guide to Add or Remove Columns
Here’s how to do it:
Step 1: Go to the Listing Page
Navigate to the module you want to customize (e.g., Leads, Deals, etc.)
You'll see a grid or table view of all records.
Step 2: Click the Column Settings Icon
Step 3: Add Columns
A sidebar or pop-up will appear with available fields.
Scroll or search for fields you'd like to add (standard or custom).
Check the checkbox next to the field name.
Step 4: Remove Columns
Step 5: Reorder Columns (Optional)
Step 6: Save the Layout
Changes are automatically saved for your user login.
When you return to this module, your selected columns will be preserved.

Use Cases by Role
Best Practices
Limit the number of columns to 5–8 fields for cleaner viewing and faster loading
Use custom fields relevant to your sales or service workflow (e.g., Lead Score, Subscription Tier, Priority Level)
Create different views for different use cases (e.g., hot leads, overdue follow-ups, high-value deals)
Combine with filters or sorting to find targeted records quickly
Regularly review your columns to keep your layout aligned with current business goals
Conclusion
Customizing columns in your Kylas CRM listing page is a simple yet powerful way to boost productivity, reduce screen clutter, and keep your most important data front and center. Whether you're closing deals, reviewing leads, or tracking product movement—this feature puts you in control of your workflow.
Related Articles
How to Freeze Any Column on the Listing Page in Kylas CRM?
Freezing columns in Kylas CRM enables users to keep important information visible whenever needed while navigating through wide tables. This feature is particularly useful for sales, operations, or support teams who need to retain visibility of key ...
How to View the Latest Notes on the Listing Page in Kylas CRM
The “Latest Note” column in Kylas CRM lets you view the most recent internal note added to a record—right from the listing page. It helps teams stay updated on meetings, follow-ups, or key action points without opening each record, improving speed ...
How to add a new user in Kylas CRM?
You can add your team members to Kylas CRM and specify their roles. The article covers the steps to be followed for creating new users in Kylas CRM. Prerequisites Permissions: Any user with access to Control Center along with the permission to ...
How to Create Different Page Layouts for Leads in Kylas CRM
Page layouts allow businesses to customize the fields and structure of the Lead creation and detail views to suit various teams or processes. For example, you can create a dedicated layout for inbound leads and another for channel partner referrals. ...
How Shift Works in Kylas CRM
The Shift feature in Kylas CRM enables organizations to define and manage user working hours. This helps improve task planning, lead routing, assignment rules, and overall productivity tracking. Shifts can be configured for different teams working ...
four vertical lines OR "Manage Columns" button.

