How to Set Up Routing Rules for Lead/Deal Assignment in Kylas CRM
Table of Contents
Introduction
Prerequisites
Understanding Routing Rules in Kylas
Types of Routing Rules
Steps to Set Up Routing Rules
5.1 Accessing the Routing Rules
5.2 Creating a New Routing Rule
5.3 Adding Filters and Conditions
5.4 Defining Assignment Logic
5.5 Saving and Activating the Rule
Use Case: Auto-Assign Leads from Website Based on Region
Best Practices
Conclusion
Introduction
Routing Rules in Kylas CRM allow you to automatically assign leads or deals to the right salespeople based on predefined logic, saving time and reducing manual effort. This feature is crucial for organizations aiming to streamline sales operations and enhance responsiveness.
Prerequisites:
Before setting up routing rules in Kylas, ensure the following:
You have Admin or Manager access in your Kylas CRM account.
Your users (sales reps) are already added and active in the CRM.
You have a clear criteria for lead/deal distribution, such as:
Geography
Industry
Source (website, campaigns, etc.)
Lead score
Ensure any required custom fields (like Region, Source, Budget) are already created in the system.
Understanding Routing Rules in Kylas:
Routing Rules in Kylas automate the lead/deal assignment process by using specific triggers, filters, and round-robin or direct assignment logic. They ensure:
Leads don’t go unassigned.
Balanced workload among sales reps.
Faster follow-up and better conversion.
Types of Routing Rules
|
| ||
|
| ||
Condition - Based |
| ||
|
|
Steps to Set Up Routing Rules
5.1 Accessing the Routing Rules
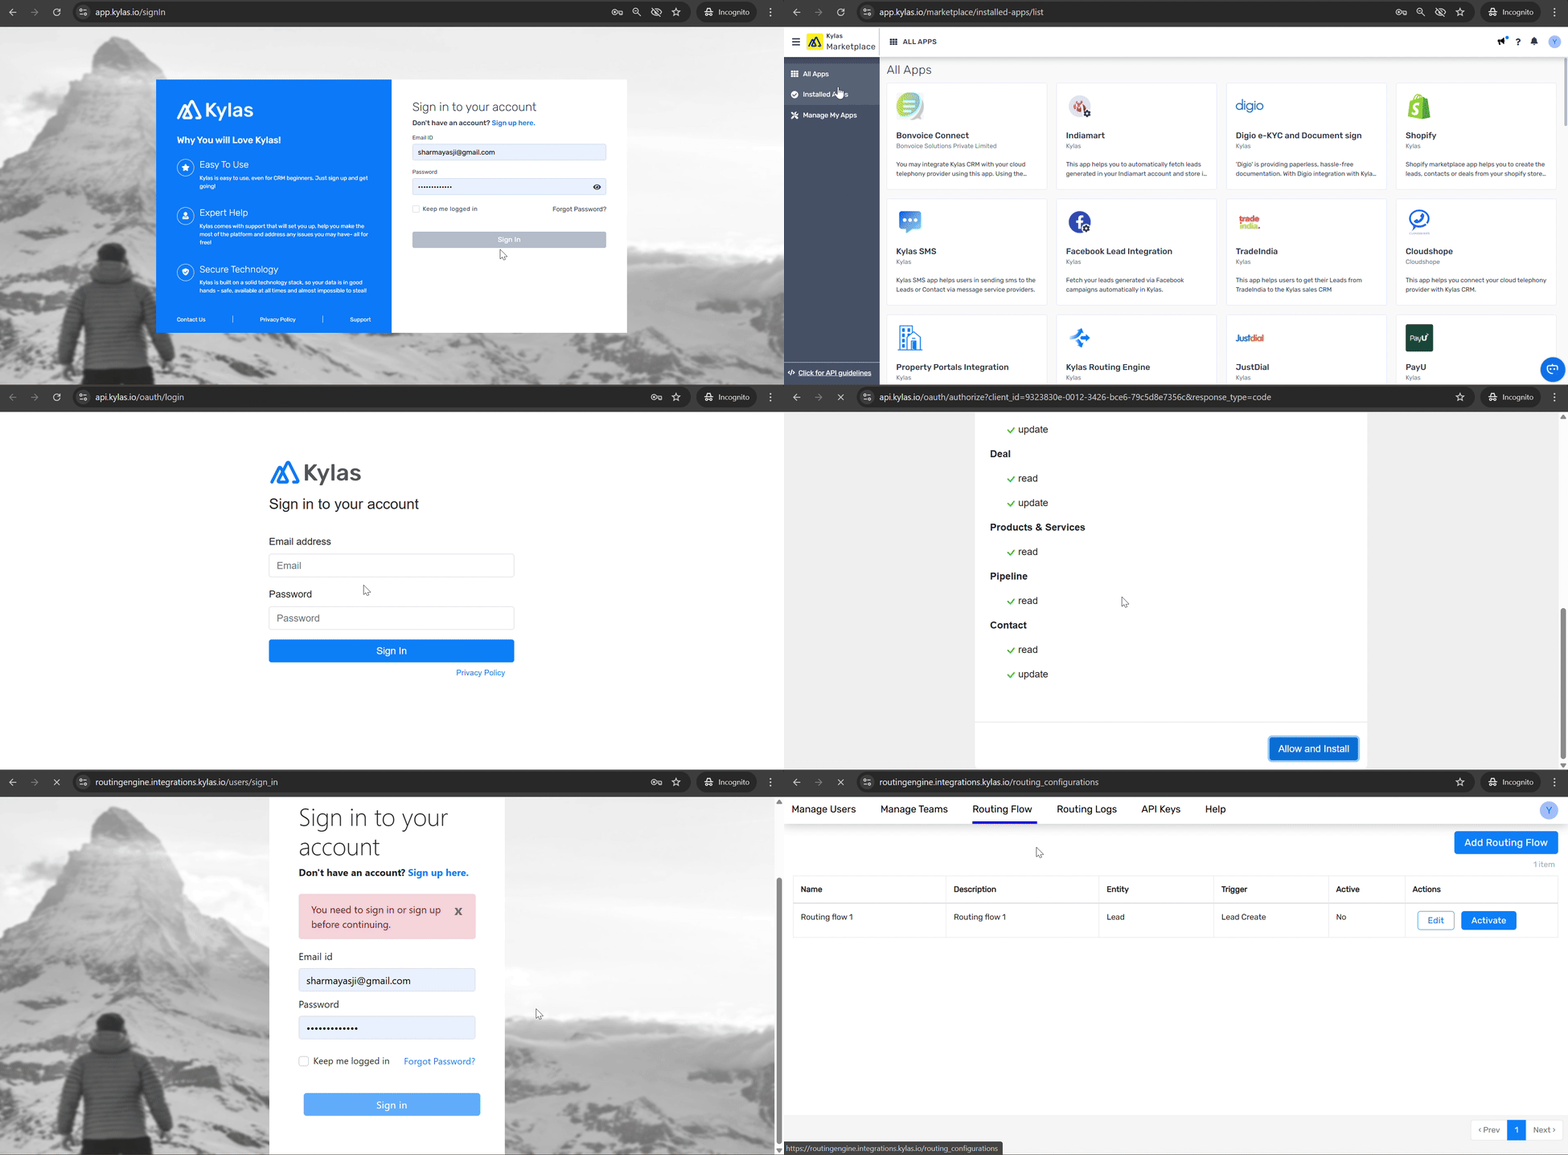
Log in to Kylas CRM with Admin/Manager credentials.
From the three lines select Kylas Marketplace.
Click on All Apps.
Click on Kylas Routing Engine.
Click on Install App.
Enter your Kylas account credentials.
Click on Allow and Install.
Now if you are a first time user you have to signup
After signup verify through the email
and enter the api key into routing engine. close this tab
Login to routing engine.
Now Create the Routing Flow.

5.2 Creating a New Routing Rule
Click on the “Add Routing Flow” button.
Give your rule a Name and optional Description.
Choose the Entity Type:
LeadorDeal.It should be triggered for Entity Create or Entity Update.
Set Yes to active.
Click on "+ Add Routing Rule" button.
Enter the name for rule.
5.3 Adding Filters and Conditions
Click on “Add Condition”.
Choose a field (e.g.,
Lead Source,Country,Industry).Add condition logic. For example:
Field:
CountryCondition:
equalsValue:
India
You can add multiple filters using AND/OR logic.
5.4 Defining Assignment Logic
Select Assignment Method:
Simple Round Robin.
Static Assignment (assign to a specific user)
Based on Field Value
Select the users/team who should be part of this rule.
5.5 Saving and Activating the Rule
Review the rule logic summary.
Click “Save”.
Toggle the status switch to “Active”.
Best Practices
Avoid overlapping rules: Make sure the same lead doesn’t match multiple rules.
Regularly review routing rules: Update rules based on team structure changes.
Test new rules: Before activating, test with dummy leads to confirm routing accuracy.
Use Tags or Notes: Tag leads with the rule name for easy traceability.
Conclusion
Setting up routing rules in Kylas CRM ensures a smooth and automated lead/deal assignment process, minimizing delays and improving productivity. Whether you're managing a small team or a large distributed sales force, automation through routing rules enhances your ability to respond faster and convert leads efficiently.
By understanding the rule types, setting clear filters, and assigning the right owners, your business can achieve better sales coordination and quicker response times—leading to higher customer satisfaction and improved sales outcomes.
Related Articles
How to Set Up Interakt and Send Messages Through Interakt in Kylas CRM
Introduction Interakt (https://www.interakt.shop/) is a leading WhatsApp Business Service Provider (BSP) that empowers businesses to engage with their customers through verified and templatized WhatsApp messages. With the Kylas CRM and Interakt ...How to Install and Connect Shopify with Kylas CRM
Table of Contents Prerequisites Step 1: Installing the Shopify App Step 2: Connecting Your Shopify Store Step 3: Mapping Shopify Fields with Kylas Step 4: Setting Up Event Triggers Step 5: Viewing Synced Information and Logs Step 6: Adding and ...How to Connect Google Ads account for lead generation in Kylas?
The Google Ads Lead Integration App in Kylas allows you to capture leads directly from your Google Ad Forms into your Kylas CRM in real time — eliminating manual data entry and enabling faster lead engagement. Prerequisites Before setting up the ...How to Integrate Kylas CRM with Your IndiaMART Account to Capture the Leads
The IndiaMART integration enables you to automatically capture leads generated from your IndiaMART account directly into Kylas CRM in real-time. This integration eliminates the need for manual data entry, ensuring that no inquiry is missed. With the ...How to set-up your Zoho Books with Kylas
This article will cover steps to integrate Zoho Books with Kylas. This app helps users to connect their invoicing application and create invoices directly from CRM itself without switching the apps. Kylas users can connect to this invoicing tools to ...