How to connect Knowlarity with Kylas CRM?
Knowlarity Communications is a cloud telephony. This article will help you walkthrough with the steps on how to sync it with the Kylas CRM.
Prerequisites
Permissions - Any user with access to the Kylas account API key or Access to Kylas Marketplace.
(a) Contact - read, read all, create, update, call
(b) Company - read, read all
(c) Lead - read, readAll, create, update, call
(d) Call - read, readAll, create, update, updateAll
Product Plans - Explore and Elevate
Activities to be completed - None
Step by Step Process
1. Initial Installation
a) Click on the Install app button
b)Sign in to your account and proceed further.
c) Listing page with all the required permissions would open up. Click on Allow and Install.
d) After installation, sign up on the application and verify the email ID.
2. Setup
a) Once the application has been installed, go to the API keys section on the kylas caller app and add the API key. (You can locate the Kylas Api key in the settings dashboard under Integrations.) Also, select the business object accordingly. Once you checkmark to any one of them, and whenever a prospect makes an inbound call the system will create the Lead/Contact based upon your selection.
b) Now to go the manage Users section where you would be adding all the Users who would be using the Knowlarity application. Click on Add User and fill in all the details required.

There are two set roles that you can assign to a particular user - Member/ Admin ( Member user would be able to access the records assigned to him whereas Admin user would have access to the data of all the users present.)
- Map the Kylas User with Kylas Agents ( Kylas Agents are the users already present in the manage users section.)
c) Once you have added all the users click on "Add Connected Account".
d) Add all the details required. Select the vendor to Knowlarity.

Note - User can add multiple IVR numbers.

Note - In order to generate the API key, Super Receptionist Number and the Caller ID, user must connect with Knowlarity's team.
User must also share the Webhook URL generated with the team to aid through the process.
e) Copy the Hangup URL and hand it over to the Knowlarity team to sync the same in your account.
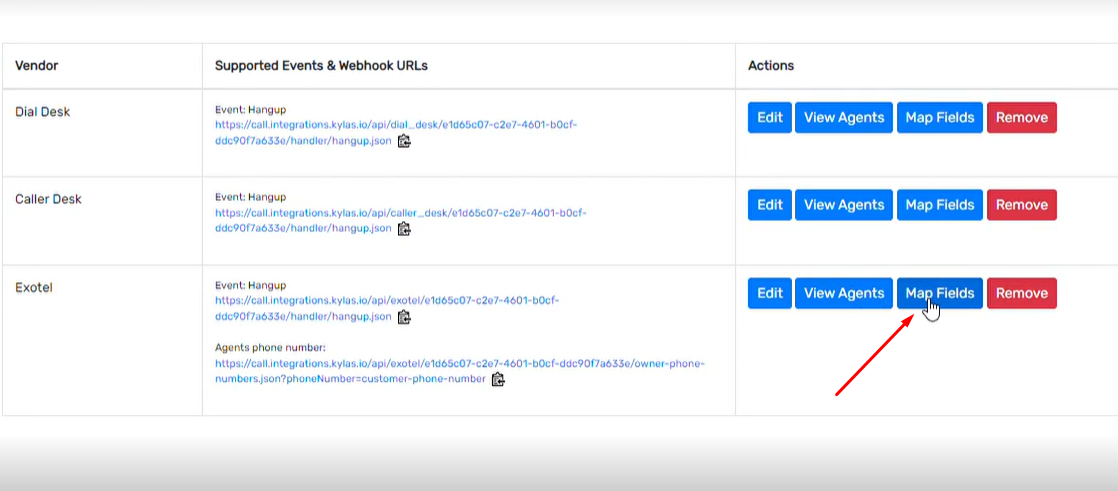
e) Post adding all the details Go to the Map fields section.
. 
f) Turn the Default mapping to Active and map the campaign, products services and source for the number you'd like to track the inquiries.

Note - Knowlarity allows the users to map the sources, campaigns and Products to multiple IVR numbers. You can click on " Add new" and connect the new number.
g) Once done, go to the Connected Accounts and add the agents, map the Knowlarity agents with that of Kylas.
Related Articles
Kylas Caller Integration for manual and automated calling
This article covers the steps to be followed and the prerequisites for installing a marketplace app. This app helps you connect your cloud telephony provider with Kylas CRM. Kylas Caller app- This helps users to connect their cloud telephony apps ...How to connect Razorpay with Kylas CRM?
Razorpay is a leading payment gateway available in the market. Razorpay - Payment links generation app helps Kylas users to connect their Razorpay account with Kylas and generate the payment links from Kylas sale CRM itself. Kylas users can connect ...How to connect Exotel with Kylas CRM?
This article will help you walkthrough with the steps on how to sync Exotel with Kylas CRM. Prerequisites Permissions - Any user with access to the Kylas account API key or having access to Kylas marketplace. (a) Contact - read, read all, create, ...How to connect Ozonetel with Kylas CRM?
This article will help you walkthrough with the steps on how to sync Ozonetel with Kylas CRM. Prerequisites Permissions - Any user with access to the Kylas account API key or Access to Kylas Marketplace. (a) Contact - read, read all, write, update, ...How to connect Kaleyra with Kylas CRM?
Kaleyra is the API-based platform to engage your clients with personalized messages, chatbots, programmable voice services, and more. This article will help you walkthrough with the steps on how to sync it with Kylas CRM. Prerequisites Permissions - ...